|
|
 |
1. Wind in the City
In the city, due to the faster warming of air especially on summer days, low pressure areas exist. Non-urban area warms up much slower, so that high pressure stays out of the city.
Therefore, a difference in atmospheric pressure develops. At the bottom of the ground the air starts to stream from non-urban areas into the city’s interior. Thereby the wind follows the corridors of the main roads and lowers its speed up to 50%. Within the city the wind speed may rise again at street corners, places, and house corners up to 20%. At these places the wind generates local eddies. In the centre of the city the temperature of air rises very much, so that the warmer air rises along the house walls, reaches higher layers of the atmosphere and streams towards the suburbs as a so-called anti-breeze. There it cools down, gets heavier and sinks and comes back to the city as an urban breeze.
You can compare the non-urban/urban-wind with the circulation of air in tropical regions or the circulation of land and sea. Ask your geography teacher for details.
|
2. Experiment
You can find out how the wind generates eddies through this experiment
2.1 Security warning
- Carry out these experiments only in the physics or chemistry lab or outside in the sand box!
- Be sure that an adult is present during the following experiments!
- Strictly follow the instructions! Otherwise fire or electric current may be a danger for your life!
- Have sand, a fire blanket, and a fire extinguisher near by!
- Never extinguish a fire with water but with sand, a fire blanket or the fire extinguisher!
- If you should not be able to extinguish the fire, leave the house and call the fire brigade!
What you need for the experiments:
|
 |
|
|
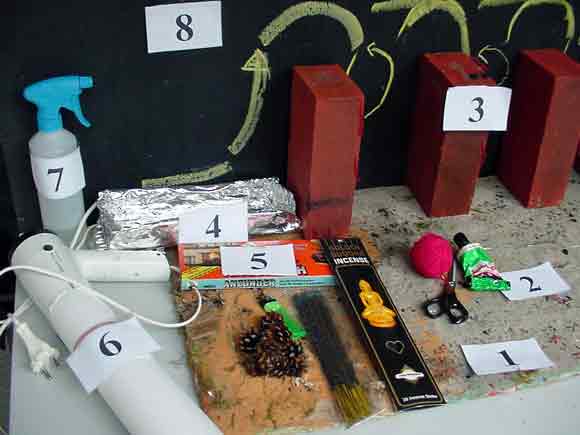
Materials for the experiment (photo taken by Gert Bauer)
|
Material:
1. Slab functioning as base
2. Wool, pair of scissors and glue to fix the sandspouts at the row of houses.
3. Houses out of small and big lime-sandstone bricks (or boxes of juice filled with water)
4. Bowl of aluminium for the fuel
5. Lighter and fir cones as fuel to cause smoke
6. Hair drier and card paper attachment for the wind channel (fixed with adhesive tape)
7. Spraying bottle to moisten the fir cones (smoke production)
8. Blackboard or black card paper functioning as a background
2.2 Setting up the experiment
|
 |
|
|
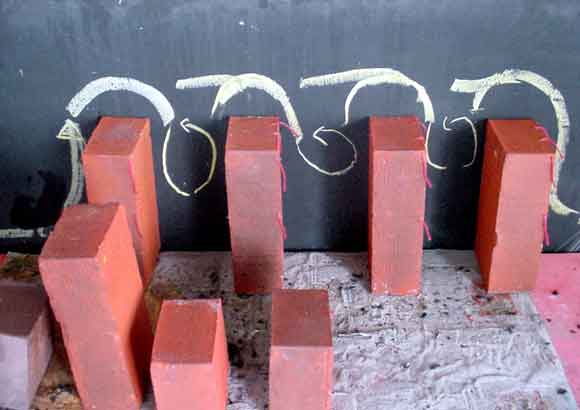
experiment set-up (photo taken by Gert Bauer)
|
|
This simplified model (like Frankfurt/Main) consists of a clough of houses, a sandy ground, and a blackboard as background.
We chose a sandy ground because it is not inflammable. The same applies to the sandstone bricks.
2.3 Carrying out the experiments:
1. As a base for the experiment you can use a slab of plastic or a paper board.
2. Sandspouts to measure the wind can easily be fixed at the outside of the buildings. Depending on the direction of wind they either have to be fixed at the left or right side. Maybe little balls of styrofoam or particles of ash can be swept along the air stream. This allows making the air stream visible.
3. Instead of bricks you can use boxes of juice filled with water.
4. The streets can be laid out with heatproof aluminium foil.
5. Smoke can be produced with the help of lighters and fir cones. (For alternative ways of producing smoke, see the following worksheet.)
6. A stream of air arises when you fix a pipe of paper at the hair drier. Most hair driers can be regulated in stages, so that the strength of wind can vary as required. Alternatively ventilators can be used; nevertheless the stream of air might become to diffuse by this tool.
7. The spraying bottle helps to moisten the fir cones.
|
Experiment 1
First it shall be tested, how the wind does circulate at a multi-storey house.
Either the wind rises along the storefront or it circles around the building. Thereby the wind speed increases up to 20%.
First you blow the smoke towards the long side of the last high building of the row. The opening of the wind machine directly focuses on the ridging of the house from a distance of 30-50 cm, so that the wind stream goes right over the top of the house. As required, the distance between the wind machine and the house can be reduced in order to find the ideal position. Now you can vary the angle between the stream of air and the house up to 45°. Afterwards the stream of air and smoke focuses the long side of the building and the procedure begins again.
|
|
 |
|
|
Idealized flow in the vicinity of one building
(author: Mateusz Kaminski)
|
|
|
|
|
Click on the icon "movie" to see a short movie of the flow in the vicinity of a building. (made by G. Bauer and B. Wohlhöfer)
|
|
Attention:
If you cannot see anything, please install the Microsoft Media Player (TM) oder the RealPlayer (TM) first.
If you have a slow modem it is better to save the file on your hard disk and run it later. If you have a fast connection, then just run the movie.
|
 |
|
|
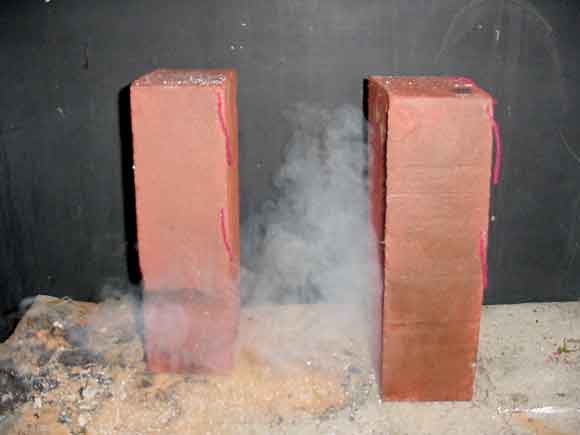
Airstream along a building (photo taken by Gert Bauer)
|
|
|
|
Click on the moviesign to see a movie about the experiment! (made by G. Bauer and B. Wohlhöfer) |
 |
|
|
Idealized flow in the vicinity of buildings
(author: Mateusz Kaminski)
|
|
|
Experiment 2
Now it shall be tested how the wind does blow above the back row of houses and how it whirls in the lee.
Thereby the wind must blow parallel to the row of houses. In this case the source of smoke must be placed in front of the long side of the first building of this row. The opening of the wind machine focuses the ridging from a distance of 30-50 cm, so that the wind blows above the top of the houses. Now the wind blows above the houses and whirls in the lee or blows along the sides of the buildings.
|
 |
|
|
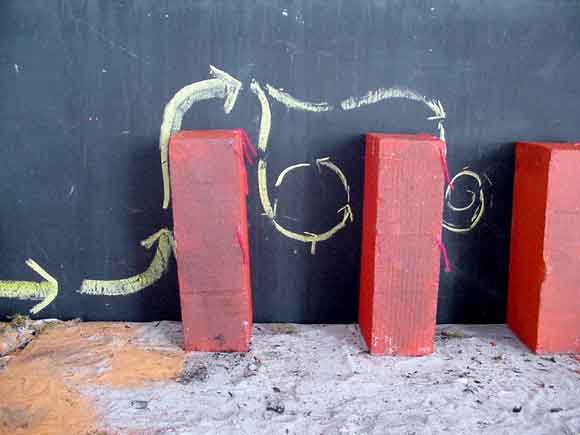
Simplyfied stream of air along a row of houses (photo taken by Gert Bauer)
|
|
|
|
Click on the moviesign to see a movie on the experiment! (made by G. Bauer and B. Wohlhöfer) |
|
Experiment 3
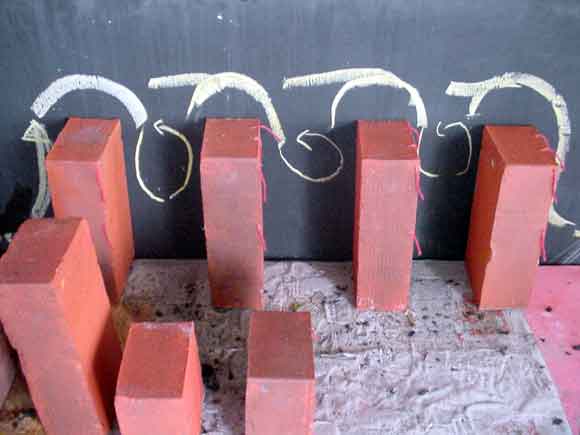
For this experiment it is important that the houses in the back are approximately 3 times higher than those in the front and that there is some kind of square in the middle of the experiment setting. The experiment is supposed to show how the wind blows in the city at house and street corners as well as in squares and that the wind speed rises up to 20%. The wind blows from the left side into the urban canyon. In our experiments we came to the conclusion that the whirls where strongest when the stream of wind and smoke was blown into the street with an angle of 45°.
|
 |
|
|
Airstream in a clough of houses (photo taken by Gert Bauer)
|
|
|
|
Click on the moviesign to see a movie on the experiment! (made by G. Bauer and B. Wohlhöfer) |
|
When you have finished the experiments, you can watch the movies, showing this experiment.
Talk about the experiments with your physics and chemistry teacher!
|
3. Importance of wind in cities
3.1 Wind channel tests
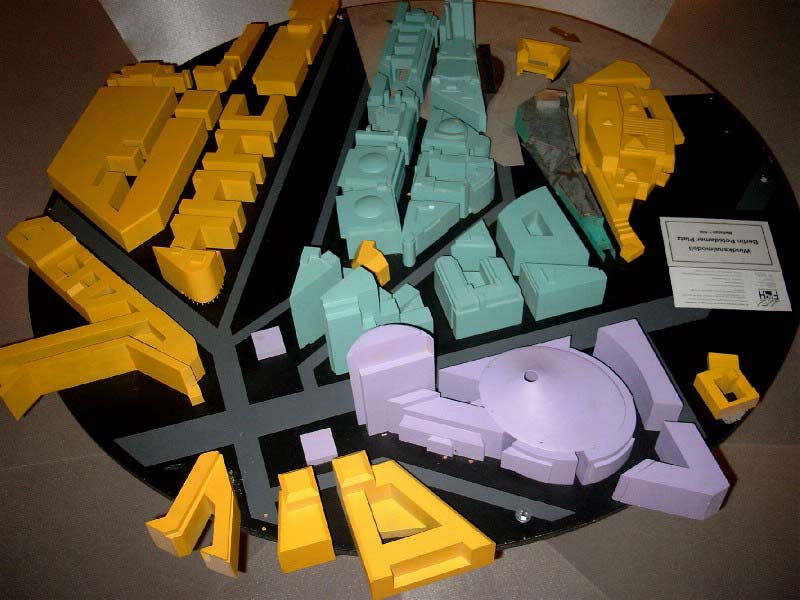
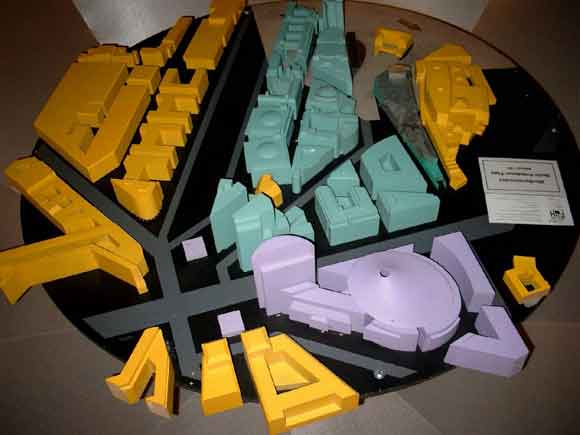
Before new parts of a city are built, it is tested in a windchannel how the air flow will behave and if there are strong winds at certain corners which should be avoided. The image shows a windchannel modell of the newly built Potsdamer Platz at Berlin.
|
 |
|
|
Photo taken by E. Uherek in the climate exhibiton of the German Museum / Munich
|
|
The most important parameters, which influence the effects of wind in a city, are the profile of wind and the roughness of the ground. Within the wind channel these parameters have to be simulated. With the help of this simulation whole areas of a city or single buildings can be tested in detail.
The result of the wind channel test can look like this: |
 |
|
|
Construction plan of a new area, showing the sections of increased windspeed in red, yellow and purple, author: Mr. Müller, Stuttgart, source: www.stadtklima.de/stuttgart/websk21/Heft13/kap3.HTM
|
|
Further links:
www.ruscheweyh.de/bauwesen.php
www.gfa.de/de/Windlasten/windlast.html
3.2. Windload on a building
The windload on a building vacillates in relation to time an space. It directly works on the outside surface of closed buildings and indirectly via openings on inside walls, depending on the predomimate direction of wind and wind speed. The following animation from the company for aerophysics shows the change of windload: |
 |
|
|
Windload on a building, author: Gesellschaft für Aerophysik mbH, Munich, animation source: www.gfa.de/de/Windlasten/windlast.html
|
Requirements towards a model:
Geometrical resemblance to the original means that you carefully have to look at the scale. In a model with the size 1:100 the wind speed must be up to 100 times higher than in reality. The experiment should be reproducible all over the world. However, identical conditions can only be guaranteed in closed rooms.
Further links to pages about skyscrapers worldwide (german or english):
www.skyscrapers.com/re/en/
www.skyscrapers.com/re/ge/
|
About this page:
- Author: G. Bauer, B. Wohlhöfer- University of Nürnberg - Germany
- scientific reviewing:
- educational reviewing: Prof. Dr. Schrettenbrunner, J. Heres
- last update: 09.09.03
|
|
|
|